Easy Puff Pastry Treats – Pinwheels

Pinwheels are seriously easy to make and they taste great. You can play around with sweet and savoury flavours and pretty much whatever you have in the fridge. If you’re having friends over for drinks, make these as the perfect snack accompaniment to have on the table or serve as canapés.

My savoury pinwheels:

I used tomato purée, a little leftover feta, some parmesan and oregano.

Then I made a sweet batch with raspberry jam, cinnamon and raisins:
 Here’s what you do: Take a sheet of puff pastry, spread on your chosen filling. Roll it up. Cut them into equal portions and bake in a preheated oven, 200’c for approximately 15 minutes. That’s it.
 

Here’s a few flavour combinations ideas for you.

Sweet

  • Cranberry and walnut
  • Nutella
  • Jam and mint
  • Honey, cinnamon and nuts
  • Mincemeat filling
  • Apple cinnamon
  • Shredded coconut and dried fruit
  • Jam and chocolate chips

Savoury

  • Pesto and cheese
  • Goats cheese and sun dried tomatoes
  • Mango pickle and cheese
  • Cheese, pickle and mustard
  • Walnut and goats cheese
  • Spinach, dill and paneer
  • Red onion and goats cheese
  • Jalapeños and cheddar
  • Blue cheese and walnut

They are quick, simple, inexpensive and delicious!
Enjoy
Peace and loaf 🙂

Banner Photo – Fougasse Bread

I have had a lot of requests and interest about the bread in my banner photo.

I first found out about this bread as part of my product design and development unit in the second year of my degree. The class was split up into groups and each given a bread product to develop. My group was given Fougasse. We researched, came up with our own flavour combinations and designed our own shape and finished look for the product.

It is a French flat bread called fougasse and is a variation on the Italian foccacia. Fougasse was traditionally used to assess the temperature of a wood fired oven. The time it would take to bake, gave an idea of the oven temperature and whether the rest of the bread could be baked. One of the distinguishing characteristics of fougasse is that it’s often baked into a shape that is somewhat like a tree or leaf, with one end resembling the trunk and the wider opposite end being more or less round in structure, the holes represent the stems of the leaf. It’s a great snack bread, to eat on the run or as part of a meal.

Recipe
500g Strong white bread flour
300g Water
50g Olive oil
8g Yeast
10g Salt

Additions
Red onion
Olives
sun-dried tomatoes
Anchovies
Pepper
Chillies
Mozzarella
Goats cheese
Caramelised balsamic onions
Feta
Bacon
Capers
Rosemary
Thyme

The flavour combinations are endless and are great fun to play with. You could also try sweet additions.

Yield
4 at 220g
Oven temperature 200’c

Mix all the ingredients together till a dough is formed. I always use my kitchenaid with a dough hook on speed one for about 10 mins. If you are kneading by hand, once the ingredients are combined stretch and knead the dough for approximately 20 minutes until a soft dough is formed. Place it in a lightly oiled bowl to ferment for 1 hour, cover with cling film. After 40 minutes you need to knock back the dough. This is done to get rid of excess air bubbles. Push the dough a few times with your knuckles (like a light kneading) until it looks at it did before fermentation, cover and leave for the remaining 20 minutes.

Then scale at 220g (approx 250g if you have added many different ingredients). Mould into rounds and leave for a 10 minute intermediate prove. On a lightly floured surface using a rolling-pin ,roll out the dough to your chosen shape. Then with a sharp blade cut the dough and separate using your fingers to shape the holes. Place on a tray and prove for 25mins. Once proved bake in a preheated oven for 10-12mins. Remove from the oven when golden and leave to cool. Some bakers brush the finished bread with olive oil to add shine and flavour.

Bread baskets - they always look awesome

Enjoy
Peace and loaf 🙂

Edible Gifts – The Best Kind

I am back! Exams are finally over and I can get back to blogging 🙂

I love the kind of presents which you can eat. They are home-made with love and care. Also sometimes you might not have the money to buy lots of presents. So, this year I decided to make everybody in my family dark chocolate dipped ginger. So delicious and warming, they can be given as gifts for Christmas, new year, new home or any family and friend event.

What you’ll need:

  • Dark chocolate
  • Crystallised ginger
  • Dipping forks
  • Thermometer
  • Tray lined with silicone paper

First you need to temper the chocolate. To do this melt 3/4 of the chocolate over a pan of simmering water making sure the water is not touching the bowl and heat to 45’c. Then remove from the heat and lower the temperature by adding the remaining chocolate which has been chopped up, for dark chocolate lower to 32’c, if using milk and white chocolate lower to 30’c. Continue stirring until all chocolate has melted and the desired temperature is achieved.

Set up your equipment in a line so you can work methodically and in the correct order. Ginger on the left, chocolate in the middle and tray on the right (if you’re left-handed you may find it easier the other way round), this will stop chocolate trails going everywhere. Okay, we are now ready to dip! Drop a piece of ginger in the chocolate, turn it over using the forks so it’s completely covered, and then tap off the excess using the forks and tip onto the silicone paper. Simple, right?

I added gold glitter to finish but you could leave them plain or decorate in any way you fancy really.

Once they have set, package them however you like, you could use gift boxes or clear bags with ribbon. I printed of little labels and tied them around my gift bags.

They taste and look great, and you put your thought and love into making them. They should be greatly appreciated!

Enjoy 🙂

Rainy Saturday afternoon – Chilli and Cheese Sourdough Baps

You all know the feeling on a Saturday afternoon when it’s horrible, wet, grey and cold outside. I was fortunate to have my lovely sister Vered from eat now talk later staying with me. This of course meant it was acceptable to stay in, make a nice dinner and watch a film. We started brainstorming ideas of what to have for dinner, something yummy and makes you feel warm but not too heavy. We had a few boiled eggs in the fridge to make into egg mayo, we had humous and various other dips. So we decided on bread rolls. I got a piece of paper and calculated a recipe adding in  hot dried chilli and chunks of cheese. I have both a white and rye sour at home, since learning about and researching sourdoughs  I really like the combination of a rye sour with white flour, so that’s we decided on. 

Recipe
327g Strong white bread flour
186g Water
55g Rye sour
7g Yeast
7g Olive oil
6g Salt
2g Sugar
4g Dried chilli (flakes are best)
20g strong hard cheese cut into chunks
Makes 4 large baps at 160g each or 5 at 130g

As it was already afternoon and we wanted the baps for dinner I decided to add yeast as well as the sour to quicken the fermentation time without compromising on taste.

Method
Mix all the ingredients together till a dough is formed. I always use my kitchenaid with a dough hook on speed one for about 10 mins. If you are kneading by hand, once the ingredients are combined stretch and knead the dough for approximately 20 minutes until a soft dough is formed. Then place it in a lightly oiled bowl  to ferment for 2 hours, cover with cling film. After an hour and 20 minutes you need to knock back the dough. This is done to get rid of excess air bubbles. Push the dough a few times with your knuckles (like a light kneading) until it looks at it did before fermentation, cover and leave for the remaining 40 minutes.

 Remove the dough from the bowl and scale into the size required. Lightly mould into balls and leave covered for ten minutes. This allows the dough to rest and be more manageable when shaping.
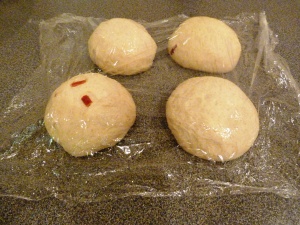
Giving the dough an intermediate prove

Giving the dough an intermediate prove

After a ten minute rest re-shape the dough, I chose to make mine round baps. Place on a baking tray making sure the dough has enough space to rise and leave covered in a warm place to prove for 35 minutes. After proving top with extra cheese (if you really like it hot you could add chilli powder or pepper to season the cheese) and add to the top of the baps.

Ready for the oven

 Bake in a pre heated oven at 210’c for 15-20 minutes( if using a fan oven lower the temperature to 200’c). If you’re unsure as to whether it’s fully baked tap the bottom of the bread, if it sounds hollow it’s fully baked, if not it needs a bit longer in the oven.

The dough structure

They tasted really good and went very well with all the dips and salad! I am very happy with the way these turned out, especially as I made the recipe up on the spot. It gave me a real boost of confidence in myself, a great feeling! The combination of rye sour and white flour worked well and the dough structure was lovely.

Enjoy 🙂

Anything you fancy – Pancakes

This week is Hanukkah, the Jewish festival of lights. We eat fried foods in memory of the oil (candle oil)  that lasted 8 days. Traditionally these fried foods included potato latkes (pancakes/rosti) and doughnuts. I decided to mix it up this year making not potato pancakes, but both savoury and sweet pancakes. I know – rebellious!
These are the simplest easiest pancakes!

Basic pancake recipe
1 cup self raising flour
1 cup milk
1 egg
pinch of salt

That’s it! whisk it all together and you have your pancake mix. Easy as. Now add any flavour you like. For my savoury pancakes I added wilted spinach, spring greens and spring onion. Add to a hot oiled pan and fry on either side for a couple of minutes or until golden.
You will be surprised at how many pancakes this mix makes!

A few savoury ideas:

  • Potato
  • Spinach
  • Corn
  • Tuna
  • Onion
  • Mushroom
  • Leek
  • Parsnip
  • Honey and mustard
  • Chives or other herbs
  • A base topped with cream cheese and smoked salmon

I also made some sweet pancakes. Use the same recipe as above including the pinch of salt and add a few tablespoons of sugar. I added grated apple and pear.

Please note, once I had added my grated fruit the mix was a bit wet from the water content in the fruit. If yours looks the same add a few more tablespoons of flour. Had I only added one fruit it probably would have been fine.

A few sweet ideas:

  • Apple
  • Pear
  • Cinnamon
  • Blueberries
  • Lemon juice
  • Maple syrup or honey
  • Bananas
  • Orange or lemon zest

These pancakes are great for a breakfast, brunch, a snack, glammed up as dessert or as part of a meal. They are also a basic Yorkshire pudding recipe.
As it is the season I’m sure you could use some Christmas leftovers the next day and turn it into something new. A Christmas pancake?

Enjoy 🙂

All Purpose Rich Fruit Cake

The original recipe is by Dan Lepard and I’ve altered it slightly. This is a rich moist all purpose fruit cake. You can make it a few weeks before Christmas and feed it alcohol. Or, if like me, you live with people that just love fruit cake, it can be for any occasion. 🙂

Ingredients:

  • 105g golden syrup
  • 125g dark brown sugar
  • 100ml double cream
  • 7g mixed spice
  • 5g cinnamon
  • 125g butter
  • 1 tsp lemon extract
  • Zest of a large orange
  • 3 medium free-range eggs
  • 500g currants, raisins,mixed peel (any dried fruit)
  • 250g natural glacé cherries
  • 250g strong white bread flour
  • 1/4 tsp bicarbonate of soda
  • brandy, whisky or alcohol of your choice
Preparation time: 30 minutes
Baking time: 2 hours

Preheat the oven to 170C/335F/Gas 3 and line a round deep cake tin with non-stick paper. Place the syrup, sugar, cream and spices in a saucepan and bring to the boil. Take off the heat and add the butter in small chunks and stir until melted, then add the orange and lemon extracts (or zest). Then add the eggs beat slightly till the mix looks smooth, then stir in the fruit. Mix the flour and soda together in a separate bowl, then stir this through evenly. Pour into the tin and bake for approx 2 hours, using your own judgement and a cocktail stick. Leave to cool in the tin.

When cold, spoon the top liberally with your choice of alcohol, wrap well and leave for 3-4 days before icing or leave for a day and eat it as it is. Alternatively, you could feed it alcohol for a few weeks leading up to Christmas and then cover with marzipan and icing.

The cherries go all chewy and yummy.
Serve with a nice hot cup of tea. Perfect 🙂